
At home Pilates workout
If you’re turned off by trying Pilates at your local gym due to the complicated apparatus often involved, consider trying mat Pilates in the comfort of your own home. Mat Pilates offers a simplified, yet highly effective approach to developing strength, flexibility, and stability, all without the need for any fancy equipment—just a yoga mat.
This workout is perfect for beginners, providing an accessible entry point into the world of Pilates. Whether you’re looking to enhance your core strength, improve your posture, or simply stay active, at-home Pilates can be a highly rewarding and enjoyable practice.
| Exercise | Rounds | Reps |
|---|---|---|
| Standing laterals | 1 | 5 on each side |
| Thread the needle | 1 | 5 on each side |
| Side leg lift | 2 | 15 on each side |
| Thoracic extensions | 2 | 10 |
| Arms & leg balance | 2 | 10 on each side |
1. Standing laterals
Technique: Stand tall with your feet hip-width apart and body in a straight vertical line (you can use a wall to guide you if you need it). Raise your arms up straight over your head, engage your core and lean to one side with a gentle reach up and across. Keep your hips stacked over your feet, moving only from the waist up.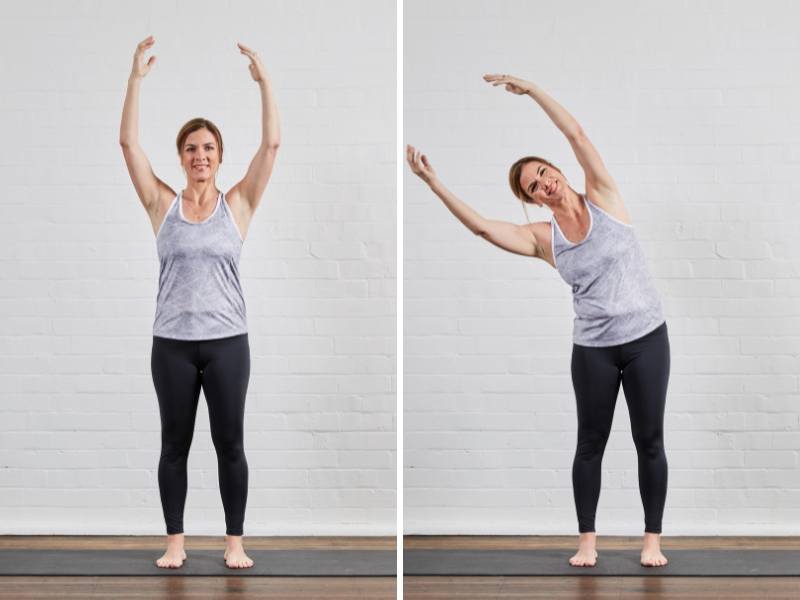 Complete 5 repetitions on each side.
Target areas: Obliques (abdominals)
Benefits: Stretching and strengthening your obliques is crucial for walking mechanics, core strength and posture. This will help you when you work out and when doing your general daily activities.
Tip: If you find this version too challenging, start by doing it with your hands by your sides, then you can progress to raising your hands behind your head, and then the full version.
2. Thread and needle
Technique: Start on your hands and knees, with your shoulders stacked over your hands and your hips directly above your knees. Draw in your stomach and ensure your spine is in a neutral position. Inhale and lift your right arm up above you, rotating your torso and opening through your chest, then pause and gently reach at the top. Slowly bring the right arm under your torso through to the left side as you exhale, like you are threading a needle. Keep your core engaged.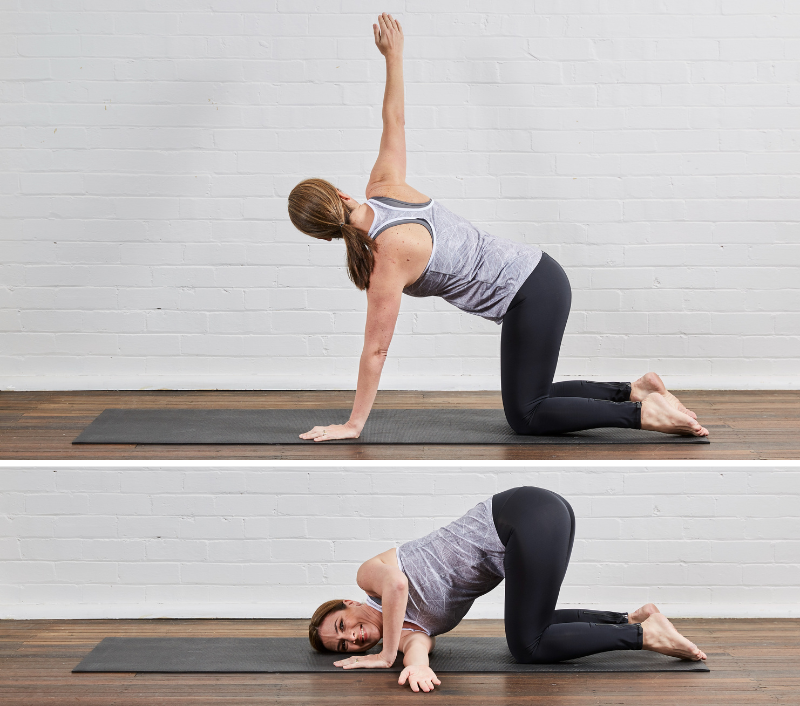 Complete 5 repetitions on each side.
Target areas: Thoracic spine, obliques, chest and shoulders.
Benefits: Strengthening and stretching the muscles that assist with thoracic rotation and shoulder movement are really important for posture, upper body strength and injury prevention.
Tip: If you have a foam roller, you can place it next to you on the opposite side to the arm that you lift. As you thread the needle you can place the back of your arm on the roller to assist you in reaching across your body.
3. Side leg lift
Technique: Lie on your side with your legs straight and slightly in front of your body at a 30-degree angle. Turn your top leg and foot inwards (like it is pigeon-toed). Exhale as you lift your leg as high as you can without moving your hips, then pause. Then inhale and lower your leg until it is just hovering above the other leg. Keep your hips stacked directly above each other.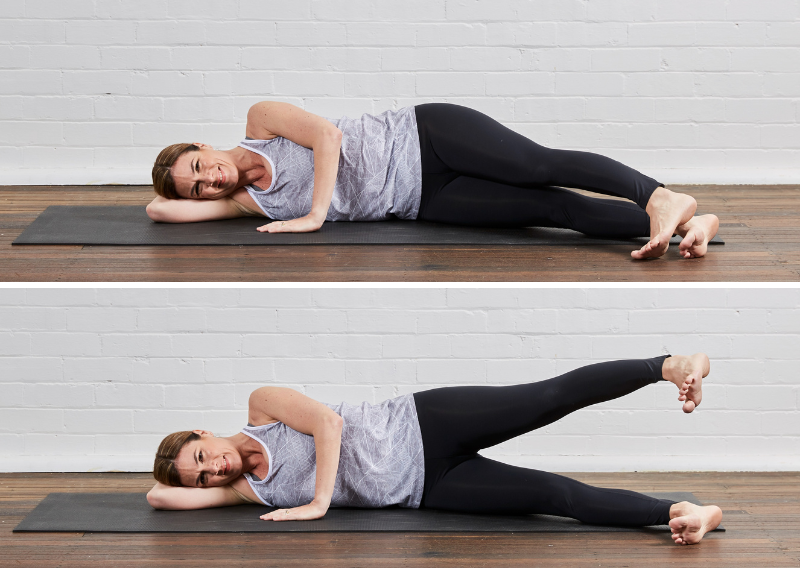 Complete two sets of 15 repetitions on each side.
Target area: Gluteus medius
Benefits: By turning the top leg in, this exercise puts your big hip movement muscles in an inefficient position, thus you have to rely on the smaller gluteus medius muscle to create movement and stabilise. This muscle is one of the most important in hip and lower limb stability, so the more stability, strength and endurance in this muscle, the better you will move day to day.
Tip: Place your top hand on your hip, making sure your lower waist is slightly lifted off the ground so your spine is straight. Use your hand to observe whether your hips move (try to keep them still). This will make it more challenging, but also more effective.
4. Thoracic extensions
Technique: Lie on your tummy with your elbows bent and hands on the floor. Engage your core to support your lower back. Inhale and draw your shoulder blades back and down towards your spine. Exhale and lengthen your neck, start to press into your hands and lift up into full extension. Your stomach should still be on the ground or just starting to lift off. Inhale and pause, opening your chest and drawing your shoulders back. Exhale and lower your back to the ground in a controlled manner. Complete two sets of 10 repetitions.
Target areas: Strengthens upper back and triceps, stretches abdominals.
Benefits: We spend a lot of time hunched forward looking at computers and phones. This exercise strengthens the muscles that fight this forward pull and stretches many of the muscles that pull us forward.
Tip: If you have trouble coming up onto your hands, keep your elbows on the ground. Also, if you have spondylolisthesis, avoid most extension-based exercises – this one is probably not for you.
5. Alternate arm and leg balance in four point
Technique: Start on your hands and knees, with your shoulders stacked over your hands and your hips directly above your knees. This is called the four-point position. Draw in your tummy and ensure your spine is in a neutral position. From here exhale, activate your glutes and slowly extend your opposite arm and leg in a controlled manner. Slowly lower on the inhale to the starting position and then repeat on the other side.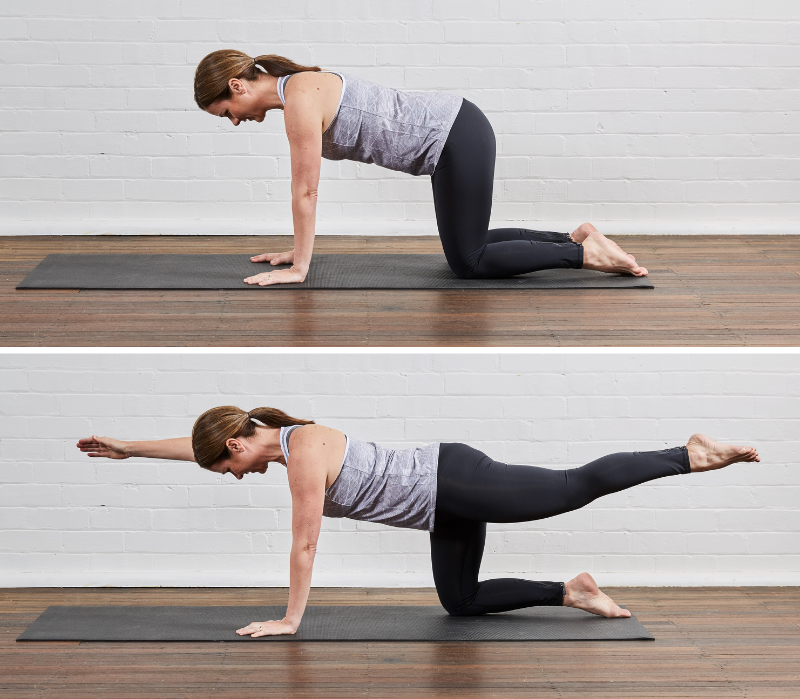 Complete two sets of 20 repetitions. (10 each side, alternating every repetition).
Target areas: Glutes, lower back, upper back and obliques.
Benefits: This exercise is great for developing the strength of your posterior sling (the integrated muscles that stabilise and help take the load off your spine when you move and lift objects). Essentially, you will feel stronger, more stable and reduce the risk of back injuries.
Tip: For an easier version, try individually lifting one limb at a time in the four-point position while keeping a neutral spine and your core activated. Lift your right arm, left arm, right leg, then left leg.